The inexpensive disposable camera provides a welcome, sentimental look back at simpler times in a time when digital photography is king. With film already loaded, these small, user-friendly cameras offer a special method of capturing memories that digital cameras are unable to match.
Your analog excursions will be as unforgettable as the moments you’re documenting thanks to this comprehensive guide to disposable cameras, which will walk you through every step of the process, from choosing the best camera to taking breathtaking pictures.
Nothing compares to seeing your produced images for the first time, even if you enjoy looking through your camera roll. Disposable cameras are incredibly lightweight, entertaining, and reasonably priced, but if you’re not careful, it’s quite simple to squander your film on pointless pictures. Don’t worry, we’ve compiled a list of the finest ways to take pictures with disposable cameras.
How do disposable cameras work?
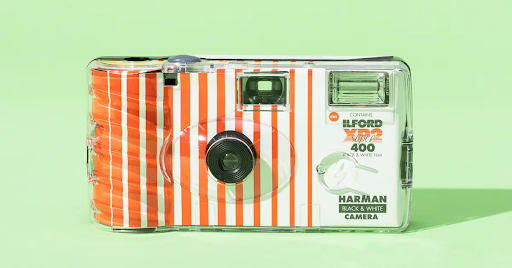
Simple plastic cameras made to be used just once are known as throwaway cameras. These small, light cameras, also referred to as single-use cameras, are pre-loaded with 35mm color or black and white film. You won’t ever need to bother about changing the exposure, shutter speed, aperture, or any other camera settings other than turning the flash on and off thanks to its fixed focal length.
You’ll need to get your pictures developed when you’ve used up all of your camera film, and it’s important to note that the majority of developers now provide both digital and printed versions.
The developer will typically send your disposable camera out to be recycled because it has served its purpose and cannot be used again, unlike instant cameras that can be loaded with new film.
how to use disposable camera
Disposable cameras offer a unique, nostalgic, and often unpredictable photographic experience. They’re incredibly simple to use, making them popular for parties, events, or just a fun way to capture memories without the fuss of digital screens and settings.
Here’s a detailed tutorial on using a disposable camera:
1. Get Your Camera Ready
Unwrap it: Disposable cameras often come in plastic or cardboard packaging. Take the camera out of its packing carefully.
Find the components: Learn about the fundamental parts of the camera:
Viewfinder: A small clear window on the back (or sometimes top) that you look through to compose your shot.
Shutter Button: A button (usually on top) that you press to take a picture.
Film Advance Wheel/Thumb Wheel: A small textured wheel or lever (usually on the top right or back) that you turn to advance the film.
Flash Button/Switch (if applicable): A button or switch, often on the front or top, for activating the built-in flash.
Shot Counter: A small window, usually on the top, that shows how many exposures you have left.
2. Advance the Film
Wind the film: Before taking your first shot (and after every subsequent shot), you need to advance the film to an unexposed frame. Put your thumb on the film advance wheel and turn it forward until it stops and a click sounds. This indicates that a new frame is ready to be exposed.
Important Note: Unlike traditional cameras where you wind film onto a take-up spool, most disposable cameras actually rewind the film back into the canister with each shot. This means that when you finish the roll, all the exposed film is safely inside the light-tight canister.
3. Use the Flash (When Needed)
Assess the light: Disposable cameras typically come with either ISO 400 or ISO 800 film.
Indoors or Low Light: You MUST use the flash indoors or in any low-light situation (e.g., cloudy days, dusk, shady areas). Even if it seems bright to your eyes, the film often needs more light.
Bright Daylight: Generally, you do not need the flash in bright, direct sunlight. Using it can overexpose your subject.
Activate the flash:
Button-activated: Some cameras require you to press and hold down a button (often on the front) for a few seconds until a red light glows or you hear a high-pitched whine. This indicates the flash is charging. Keep holding it until you take the photo.
Switch-activated: Others have a switch you slide to the “ON” position. A red light will typically glow when it’s ready, and you don’t need to hold it down.
Wait for the flash to charge: Prior to hitting the shutter, always wait for the indication light to indicate that the flash is ready. If you shoot too quickly, the flash won’t fire.
Flash range: Be aware that the built-in flash on disposable cameras has a limited range (e.g., 5-10 feet or 1.5-3 meters). Subjects beyond this distance might appear dark.
4. Compose Your Shot
Hold steady: Using both hands, hold the camera as motionless as you can.
Look through the viewfinder: Using the tiny viewfinder, hold the camera up to your eye.
What you see is approximate: Disposable camera viewfinders are very basic. What you see through them is just an approximation of the final image. Don’t expect perfect precision.
Keep fingers clear: A common mistake is accidentally covering the lens or flash with your fingers because the camera is so small. Always check that your fingers are not obstructing the front of the camera.
Distance: Disposable cameras have a fixed focus lens, meaning they are designed to be sharp within a certain distance range (e.g., 4 feet to infinity). Try to keep your subjects within this range for best results. Avoid extremely close-up shots as they will likely be blurry.
5. Take the Picture
Press the shutter button: Once you’ve composed your shot and, if needed, activated the flash, press the shutter button all the way down until you hear a click.
6. Finish the Roll
Keep shooting: Continue the process of advancing the film, using the flash when necessary, composing, and shooting until the shot counter reaches “0” or the film advance wheel no longer turns.
Don’t force it: Once the film is fully wound, don’t try to force the winder.
7. Get Your Photos Developed
Do NOT try to open the camera: Once you’ve finished the roll, do NOT try to open the camera yourself.
Take the entire camera to a photo lab: Disposable cameras are designed to be dropped off as they are. Take the whole camera to a photo lab that develops 35mm film. Many drugstores (like CVS, Walgreens, Boots, Walmart Photo), photo specialty stores, and online mail-in labs offer this service.
Choose your output: You can usually choose to get:
Prints: Physical copies of your photos.
Digital Scans: Digital files of your photos (e.g., on a CD, USB drive, or via online download). This is highly recommended for sharing and preserving your images.
Negatives: The developed film strips. It’s always a good idea to get your negatives back as they are the original “master” copies.
Wait for development: Film development takes time, usually a few days to a week or more, depending on the lab. Enjoy the anticipation!
8. Disposal/Recycling
While called “disposable,” many components of these cameras (like the plastic body and internal parts) are recyclable. Ask your photo lab about their disposal or recycling options when you pick up your developed photos.
Tips for using a disposable film camera
Using a disposable film camera is a fantastic way to embrace a more spontaneous and nostalgic approach to photography.
1. Master the Flash (Crucial for Most Shots)
Always use the flash indoors or in low light: This is the most common mistake. Even if a room seems bright to your eyes, disposable cameras often use ISO 400 or 800 film, which still needs significant light. If in doubt, use the flash. It’s almost always better to overexpose slightly than to have a completely dark, unusable photo.
Mind the flash range: Disposable flashes are not powerful. They are usually effective only within about 5-10 feet (1.5-3 meters). Subjects beyond this distance will appear dark, even with the flash on.
Consider using flash outdoors, even in daylight: A surprising tip! Using the flash in bright daylight can act as a “fill flash,” softening harsh shadows on faces and adding a unique, often dreamy, vintage look with bright, poppy colors.
2. Understand Limitations (Embrace the Imperfections)
Fixed Focus & Exposure: Disposable cameras have fixed lenses, fixed aperture (usually around f/10), and fixed shutter speed (around 1/100 to 1/125 sec). This means:
Fixed Focus Distance: Most are sharpest from about 4 feet (1.2 meters) to infinity. Avoid trying to shoot extreme close-ups, as they’ll likely be blurry.
No Manual Control: You can’t adjust ISO, aperture, or shutter speed.
Embrace the “Look”: The charm of disposable cameras lies in their imperfections – the inherent graininess (especially in low light), the slight light leaks, the muted colors, and the raw, unpolished feel.
3. Hold Steady & Watch Your Fingers
Use two hands to hold the camera: Because disposable cameras are small and light, they are prone to camera wobble. Hold it as steadily as possible to minimize blur, especially since their shutter speeds aren’t super fast.
4. Compose Carefully (But Don’t Overthink It)
Look through the viewfinder: Use the small plastic viewfinder to frame your shot.
Approximate View: It usually shows slightly less of the scene than what the lens captures. If in doubt, take a small step back to ensure you get everything you want in the frame.
Think about your subject: Try to fill the frame with your subject rather than having them be a tiny part of a vast scene, especially when using the flash.
Experiment with angles: Since you can’t review instantly, play around! Try shooting from low angles, high angles, or tilting the camera.
5. Always Advance the Film
After you press the shutter button, immediately turn the thumb wheel until it clicks and stops. Nothing is more frustrating than missing a moment because you forgot to advance the film!
6. Consider the Lighting
Bright, natural light is your best friend: Disposable cameras excel in outdoor, sunny conditions. The fixed exposure settings are optimized for this kind of light.
Avoid shooting directly into the sun: This will likely result in silhouetted subjects or extreme lens flare.
Beware of reflective surfaces with flash: Avoid using the flash when shooting directly into mirrors, glass, or very shiny objects, as the flash will bounce back and likely blow out the photo.
7. Don’t Over-Develop (Literally)
While film doesn’t “expire” instantly, colors can shift and quality can degrade if exposed film sits undeveloped for a very long time, especially in hot or humid conditions.
8. Manage Expectations
For truly important events where you need guaranteed high-quality results, use a digital camera. Disposable cameras are for fun, experimentation, and capturing a distinct vibe. By following these tips, you’ll significantly increase your chances of getting great, memorable photos from your disposable film camera, and truly enjoy the unique experience it offers.
how to get digital pictures from disposable camera
To get digital pictures from a disposable camera, you need to first get the film developed at a photo lab. The lab will provide you with either prints, digital scans, or both. If you opt for digital scans, they can be emailed to you or made available for download. You can then save these digital photos to your phone or computer.
Here’s a more detailed breakdown:
1. Develop the film:
- Request digital scans: When you drop off the camera, specify that you want digital scans of the photos in addition to, or instead of, prints.
- Mail-in services: If you don’t have a local lab, consider mail-in services like The Darkroom or Indie Film Lab.
2. Receive your digital photos:
- Email: The lab will typically email you a link to download your digital images.
- Cloud storage: You can also upload them to cloud storage services like Google Drive or Dropbox.
3. Optional: Scan prints (if you only received prints):
- Use a scanner: If you have a flatbed scanner at home or access to one at a library or other location, you can scan the prints yourself.
- Smartphone scanning apps: Apps like Google PhotoScan can be used to scan photos with your phone’s camera.
- Professional scanning service: If you want the best quality scans, consider using a professional scanning service.
4. Transfer to your phone:
- Cloud storage: If you uploaded your photos to cloud storage, you can access them on your phone through the respective app.
- USB transfer: Connect your phone to your computer and transfer the files directly.
how does fujifilm disposable camera work
Fujifilm disposable cameras are simple, single-use film cameras. To use one, you wind the film advance wheel, point the camera, and press the shutter button to take a picture. After taking all the photos, the film needs to be developed at a film processing lab.
Here’s a more detailed breakdown:
1. Winding the film:
Before taking your first picture, and after each subsequent one, you need to advance the film to the next frame. This is done by turning the wheel on the top right of the camera. You’ll know the film is advanced when you hear a click.
2. Framing and Focusing:
Look through the viewfinder to compose your shot. There’s no focusing mechanism on most disposables, so be mindful of the distance to your subject.
3. Taking the picture:
Press the shutter button firmly to take the picture. On waterproof models, you’ll pull a lever instead of pressing a button, according to wikiHow.
4. Flash:
If your camera has a flash, you may need to activate it separately by pressing a flash button or switch. A red light will usually indicate when the flash is ready, says a YouTube video about disposable cameras.
5. Developing the film:
They will process the film and make prints or scans, according to EverPresent.
Key things to remember:
- Disposable cameras are designed for one-time use.
- They are relatively inexpensive and user-friendly, making them a great option for beginners or for capturing casual moments, according to a guide on disposable cameras.
- Image quality is generally lower than with more advanced cameras.
- The flash is important in low-light situations or when taking close-up shots.
- Be aware of the expiration date of the film.
how many pictures can you take on a disposable camera
A disposable camera typically allows for 24 to 36 exposures, meaning you can take that many pictures. Some common cameras like the Kodak FunSaver and Fujifilm QuickSnap offer 27 exposures. The number of shots remaining is usually indicated on a counter on the top or back of the camera.
Conclusion: what is a digital camera
Because they are simple to use, disposable cameras are still in use to some extent. Particularly if you are searching for something to photograph underwater, you can capture some amazing images. Before taking a picture, always be sure you wind the film and allow the flash to charge. Get your pictures developed and enjoy them after you’ve finished the film.
Planning an event? Here’s a helpful guide on how to plan a baby shower on a budget that you might enjoy.
Before your next adventure, don’t forget to read our Prayer for Safe Travel guide for peace and protection on the road.


https://www.facebook.com/Tanvir.mk4/